About the Sketch Editor
A sketch is the drawing that shows where you marked the utilities — the picture that goes onto the completion package. LocateOps has a built-in editor for drawing locates right on the ticket, with utility-line styles, symbols, and reusable basemaps so you're not redrawing the same site twice.
This guide covers where sketches live on a ticket, the three kinds of sketch, the drawing tools, utility lines and their styles, and the reuse features (basemaps and templates) that save you the most time.
Sketches are part of the completion record. The primary sketch and your auxiliary sketches are pulled into the completion PDF that gets reported to the call centre and the excavator — so a clear sketch is part of doing the locate, not an afterthought.
The Sketches Tab
Open a ticket and go to the Sketches tab. It's organised into three groups:
| Group | What it's for |
|---|---|
| Primary Sketch | The main drawing for the ticket. There's one per ticket. |
| Basemaps | Reusable background drawings you build once and reuse — a site, an intersection, a yard. |
| Auxiliary Sketches | Extra sheets — one per utility or area — grouped under the basemap they came from. |
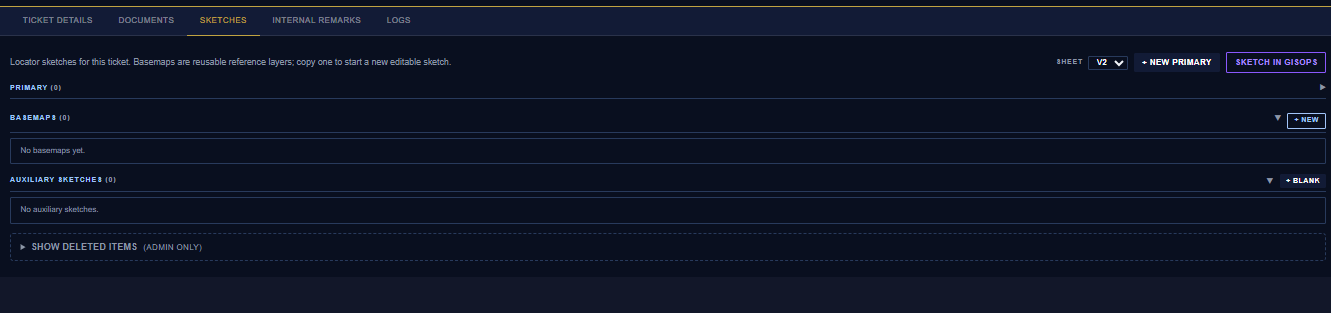
Three buttons create new sketches:
- + New Primary — creates the primary sketch (disabled once one exists).
- + New Sketch — creates an auxiliary sketch (a blank sheet, or From Basemap).
- + New Basemap — creates a reusable basemap you can build auxiliary sheets from.
An auxiliary sketch needs its utility set before it can be saved — the completion PDF uses that to label the sheet (the “selected utility” line). Pick the utility when you create or before you save.
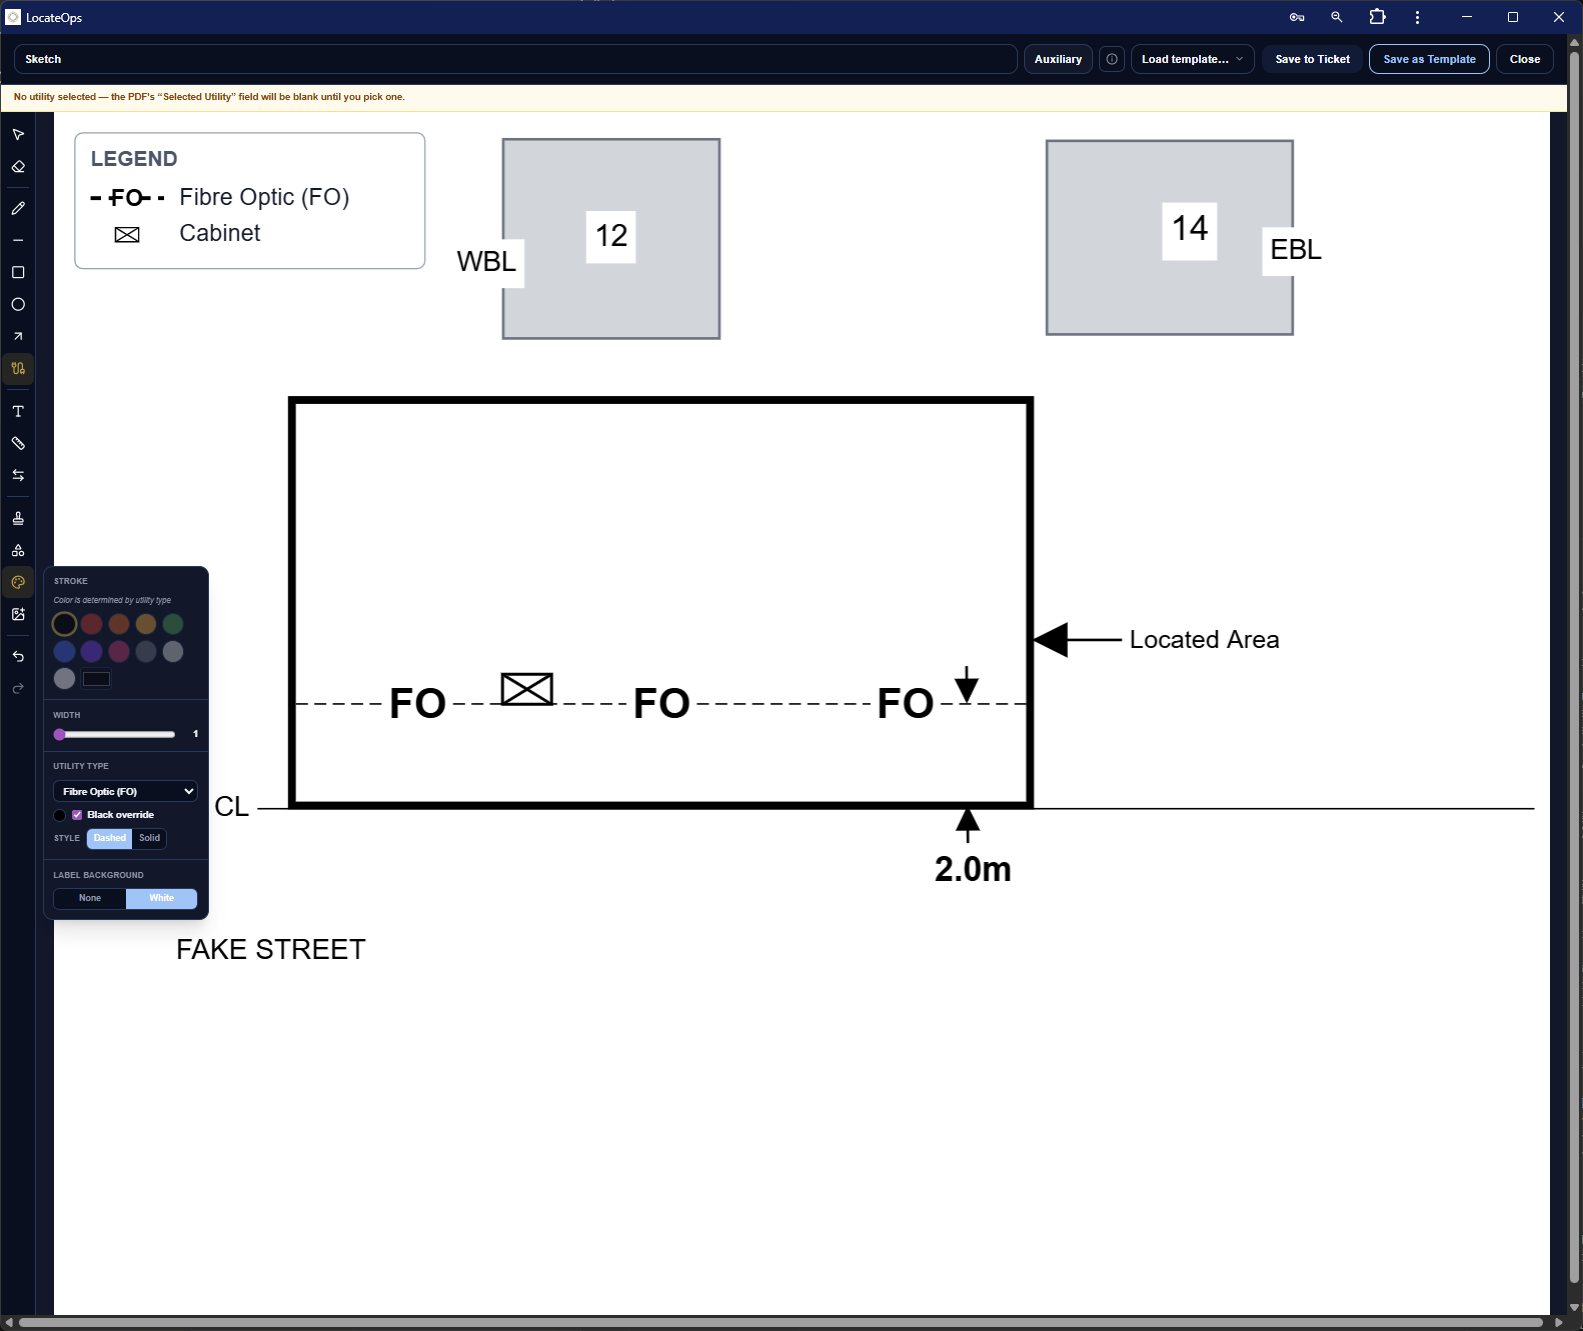
Drawing — The Toolbar
The editor is a drawing canvas with a toolbar of tools. On a computer the toolbar runs down the left; on a phone it's a slide-out tab so the drawing fills the screen.
The tools include:
- Select — pick a shape to move, resize, restyle, or delete it.
- Utility lines — the dashed/solid coloured lines that represent each utility (gas, electric, telecom, and so on).
- Shapes — lines, rectangles, circles, and freehand for everything else.
- Stamps & symbols — quick markup elements (valves, poles, and the like).
- Text — labels on the drawing.
- Image — drop in a photo or reference image to trace or annotate.
- Colour — set the colour (and fill) of what you draw.
- Undo / Redo and Delete — fix mistakes and remove the selected shape.
On a phone
On a phone the toolbar collapses to a small tab on the right edge of the screen — tap it to slide out every tool, tap again to tuck it away so the canvas owns almost the whole screen. The same tools are there; they're just sized for touch.
Utility Lines & Linetypes
Utility lines are the heart of a locate sketch — each utility has its own colour, abbreviation, and line style. LocateOps gives you sensible defaults you can fine-tune.
Styles you control
- Dashed or solid — most utility lines default to dashed; toggle a line to solid where your standards call for it.
- Colour — each utility type has a standard colour; you can override per line.
- Black override — a per-user default that draws utility lines in black (useful for clean print/photocopy output). It's on by default and remembered for you; turn it off if you prefer colour.
- Fill opacity — for rectangles and circles, a slider sets how solid the fill is.
Your company can customise the linetype palette — labels, abbreviations, colours, and default styles — under Settings → Linetypes. The editor uses your company's linetypes when you draw, so everyone's sketches look consistent.
Polylines
A straight line can become a multi-segment polyline — handy for a utility that bends. Draw a line, select it, and choose Convert to Polyline; you'll get draggable points at each vertex to shape the run.
Snapping while you draw
Hold Shift while drawing a line to snap it to clean angles. An amber dot appears at the snapped endpoint so you can see exactly where it locked.
The auxiliary legend
Auxiliary sketches automatically build a legend in the bottom-left corner from the utility lines you've drawn — so the sheet explains itself without you maintaining a key by hand.
Reusing Work — Basemaps & Templates
If you locate the same sites repeatedly, draw the background once and reuse it. This is where sketching gets fast.
Basemaps
- Create a basemap (+ New Basemap) and draw the unchanging background — roads, buildings, the site layout.
- From that basemap, create auxiliary sheets with + From Basemap — each new sheet starts with the basemap already drawn.
- Add just the utility-specific markings on each sheet.
Auxiliary sheets stay grouped under the basemap they came from, so a multi-utility site's sheets are kept together.
Switching between related sheets
When you have an auxiliary sketch open that came from a basemap, the editor shows an Other Sketches picker — jump to a sibling sheet and the current one auto-saves first. (If a save fails, you stay on the current sheet so nothing is lost.)
Templates
Templates are saved starting-point drawings. Your company (and platform administrators) can provide default templates so a new sketch begins from a standard layout instead of a blank canvas. Use them where your work follows a repeatable pattern.
Saving & the Completion PDF
Sketches save to the ticket as you work. When the ticket is completed, the primary sketch and the auxiliary sheets are rendered into the completion package PDF — so what you draw is what the call centre and excavator receive. Make sure your sketch is finished before you complete and upload.
Auxiliary sheets appear in the package in an order you can arrange when you preview the completion PDF — see the Completing Tickets guide for the package preview.
Sketching Offline
Sketches are view-only offline — you can open and look at any sketch you've cached, but creating or editing a sketch needs a connection. Draw your sketches when you have signal (back at the truck or the office); you can review them anytime, including in a dead zone. See Using LocateOps Offline.
Common Scenarios
“I keep redrawing the same intersection.”
Build it once as a basemap, then create each locate's sheet with + From Basemap. You'll only draw the utilities, not the background.
“My auxiliary sketch won't save.”
It needs its utility set — the PDF labels the sheet from it. Pick the utility for the sheet and save again.
“The lines should print in black.”
The black override does exactly that, and it's on by default. If your lines are coloured, turn the override back on (it's remembered for you).
“A utility line needs to bend.”
Draw it as a line, select it, and Convert to Polyline — then drag the vertices to follow the run.
Gotchas & Tips
Auxiliary sketches need a utility set to save — the completion PDF labels each sheet from it.
Sketches are view-only offline. Draw where you have signal; review anywhere.
There's one primary sketch per ticket — the + New Primary button disables once it exists.
Your company's linetypes drive the palette — set them under Settings → Linetypes for consistent sketches.
Basemaps are the biggest time-saver — draw the background once, reuse it on every sheet.
Hold Shift to snap clean angles; the amber dot shows where the line locked.
Can't find what you need? We respond personally to every message.